F110S
MINI Racing Drone
Altitude Hold by Inertial Navigation

Instruction Manual
Radiolink Electronic Ltd
* Please be kindly noted that this manual will be updated regularly and please visit Radiolink official website to download the latest version.
Thanks for purchasing RadioLink mini drone F110S.
To fully enjoy the benefits of this product and ensure safety, please read the introduction carefully and set up the device as described below:
If any problems found during the operation process, please kindly refer to the manual first. Then pilots could contact our distributors to find solution or follow our Facebook homepage https://www.facebook.com/Radiolink-1455452961436694/after_service@Radiolink.com.cnafter_service1@Radiolink.com.cn to search related key words. Also pilots can send questions to https://www.facebook.com/Radiolink-1455452961436694/after_service@Radiolink.com.cnafter_service1@Radiolink.com.cn or https://www.facebook.com/Radiolink-1455452961436694/after_service@Radiolink.com.cnafter_service1@Radiolink.com.cn and we will answer your question at the earliest.
Due to unforeseen changes in production procedures, the information contained in this manual issubject to change without notice.
For more information please check our website http://www.Radiolink.com and follow our Facebook and youtube homepage.

SAFETY PRECAUTIONS
Never operate models during adverse weather conditions. Poor visibility can cause disorientation and loss of control of pilots model.
Never use this product in a crowd or illegal areas.
Make sure no props installed when setting parameters of Mini Pix (the flight controller) on Mission Planner (MP) or calibrating ESC.
Always ensure the trim levers at 0 and battery properly charged before connecting the receiver.
Always check all servos and their connections prior to each run.
Stay at a certain distance from the aircraft during flight to avoid getting hurt by the components of high-speed rotation (eg. Props, brushless motors)
After landing off, make sure the aircraft is disarmed and props have stopped moving before getting close to touch the aircraft.
Always be sure about turning off the receiver before the transmitter.
When removing battery, NEVER pull the wires but please do press the yellow port with one hand and pull the other yellow port with another. If the wrapping materials damaged , the bare wires may cause DANGER.
Follow the instructions of props installation in case of dropping during flight.
To ensure the best radio communication, please enjoy the flight at the space without
interference such as high voltage cable, communication base station or lauching tower.
WARNING
This product is not a toy and isNOTsuitable for children under the age of 18. Adults should keepthe product out of the reach of children and exercise caution when operating this product in thepresence of children.
Water or moisture may enter the transmitter inside through gaps in theantenna or joystick and cause model instability, even out of control. If running in the wet weather(such as game) is inevitable, always use plastic bags or waterproof cloth to cover the transmitter.
Packing List
NO. | Items | Standard | Image Transmission | Unit | |
1 | F110S | Main Plate | 1 | 1 | piece |
Flight Controller: CS360 | 1 | 1 | piece | ||
Receiver: R8FM | 1 | 1 | piece | ||
Propeller | 4 | 4 | piece | ||
Motor | 4 | 4 | piece | ||
2 | 1S 660mAh 25C LiPo Battery | 1 | 1 | piece | |
3 | SparePropeller | 4 | 4 | piece | |
4 | Battery USB Charger: CM120 | 1 | 1 | piece | |
5 | Propeller Protection Covers | 4 | 4 | piece | |
6 | Tool of Propeller Uninstallation | 1 | 1 | piece | |
7 | Mini Screwdriver | 1 | 1 | piece | |
8 | Camera with Image Transmission | 0 | 1 | piece | |
9 | Packing box | 1 | 1 | piece |
Specification
Name | F110S (Altitude Hold Micro Racing Drone) |
Weight | 170g(all includes the pack) |
Size for Packing Box | 22.5*12.5*5.5cm |
Size for F110S | 110mm×44mm(without propeller) |
Motor | 8520(Coreless, brushed) |
Flight Time | 6 to 8 min(1S 660mAh Li-Po battery) |
Control Distance | 2000 meters air(with R8FM) |
Propeller Diameter | 55mm |
Support Transmitters | all support SBUS |
Charge Mode | Standard: DC 5V-1A, Fast: DC 5V-2A |
Chapter 1 Features Highlights of F110S
As the only micro racing drone that fly at high speed at Altitude Hold Mode, F110S is very easy to master for drone freshman. The inertial navigation system technology blending Kalman filtering, gyro, accelerometer and barometer makes F110S possible to flight through narrow space with accuracy and hold altitude no matter close to surface (less than one-meter height) or at high speed. With three flight modes Alt-Hold at low speed, Alt-Hold at high speed and Stabilize, beginners can flight stably at the first trial.
Remains stable even facing with sudden airflow fluctuations such as during takeoff, under braking, or after extended flying.
Can be thrown and start to fly in any angle even under high-speed.
Without compass locking,F110S always automatically modify angles during flight.
Monitored by Radiolink brand new mini racing drone flight controller CS360, which is different from other flight controllers that need to set PID tuning before use,will tune automatically.
Assembled as building blocks makes the RC students exercise their DIY ability and free from lengthy mobile games.
The software noise reduction technology not only enables a more pleasant flight but also makes the motors more responsive and more efficient than traditional 8520 coreless motors.
Chapter 2 Before Flight
2.1 Power Supply
Power for transmitter T8FB: T8FB supports 4 pieces AA batteries or 2S to 4S LiPo battery. Make sure the battery is fully charged before using them/it to power on T8FB.
 Power for F110S: The voltage of 1S LiPo battery packed with F110S by default is not fully charged so the battery needs to be charged with the charger CM120 before flight.
The LiPo battery charger CM120, specially designed for 1S LiPo battery,sharing the professional development and high precision of CB86PLUS, ensures safer charging and battery life span.
Charging current can be set as 1A or 2A by toggling the switch at the side of the charger.
Red LED indicates the battery is under charging and green LED indicates the battery is fully charged.
CM120 appliesgeneral USB connector, both computer and power bank for mobile phone can be used with CM120.
Note Voltage output of power supply should be NO higher than 5V.
2.2 Remote Controller
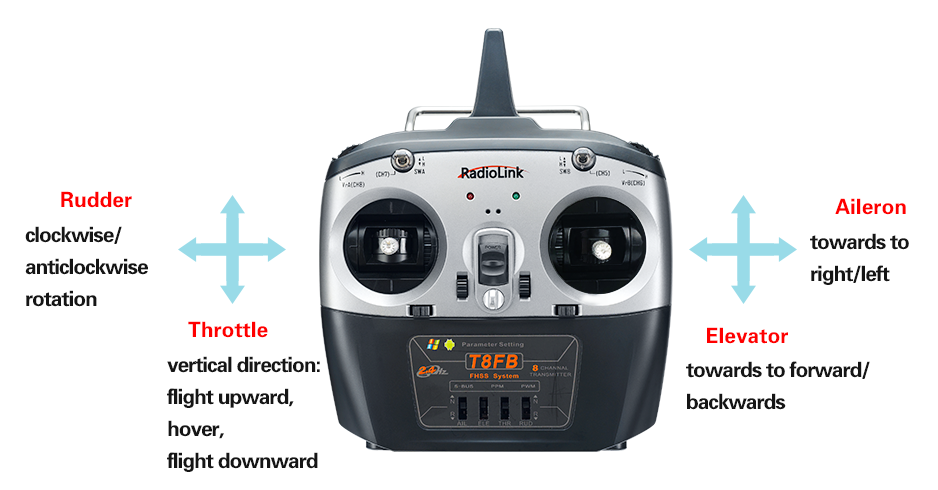
Note The below example takes RadioLink radio T8FB Mode 2 (Throttle on the left stick) .
The two joysticks of T8FBcorrespond to the four basic channelsrespectively .
Left stick
Make the F110S rise or descend by pushing the left stick vertically upward or downward while make the F110S rotates clockwise or anticlockwise by pushing the left stick to the left or right.
Right stick
Make the F110S flight forward or backwardby pushing the right stick vertically upward or downward while make the F110S flight towards to left or right by pushing the right stick to the left level or right.
2.3 F110S
Assembled as building block makes the RC students exercise their DIY ability and free from lengthy mobile games.
Learning knowledge of science and technology when assembling, setting parameters and flight.
2.4RC Joysticks & Flight Movements
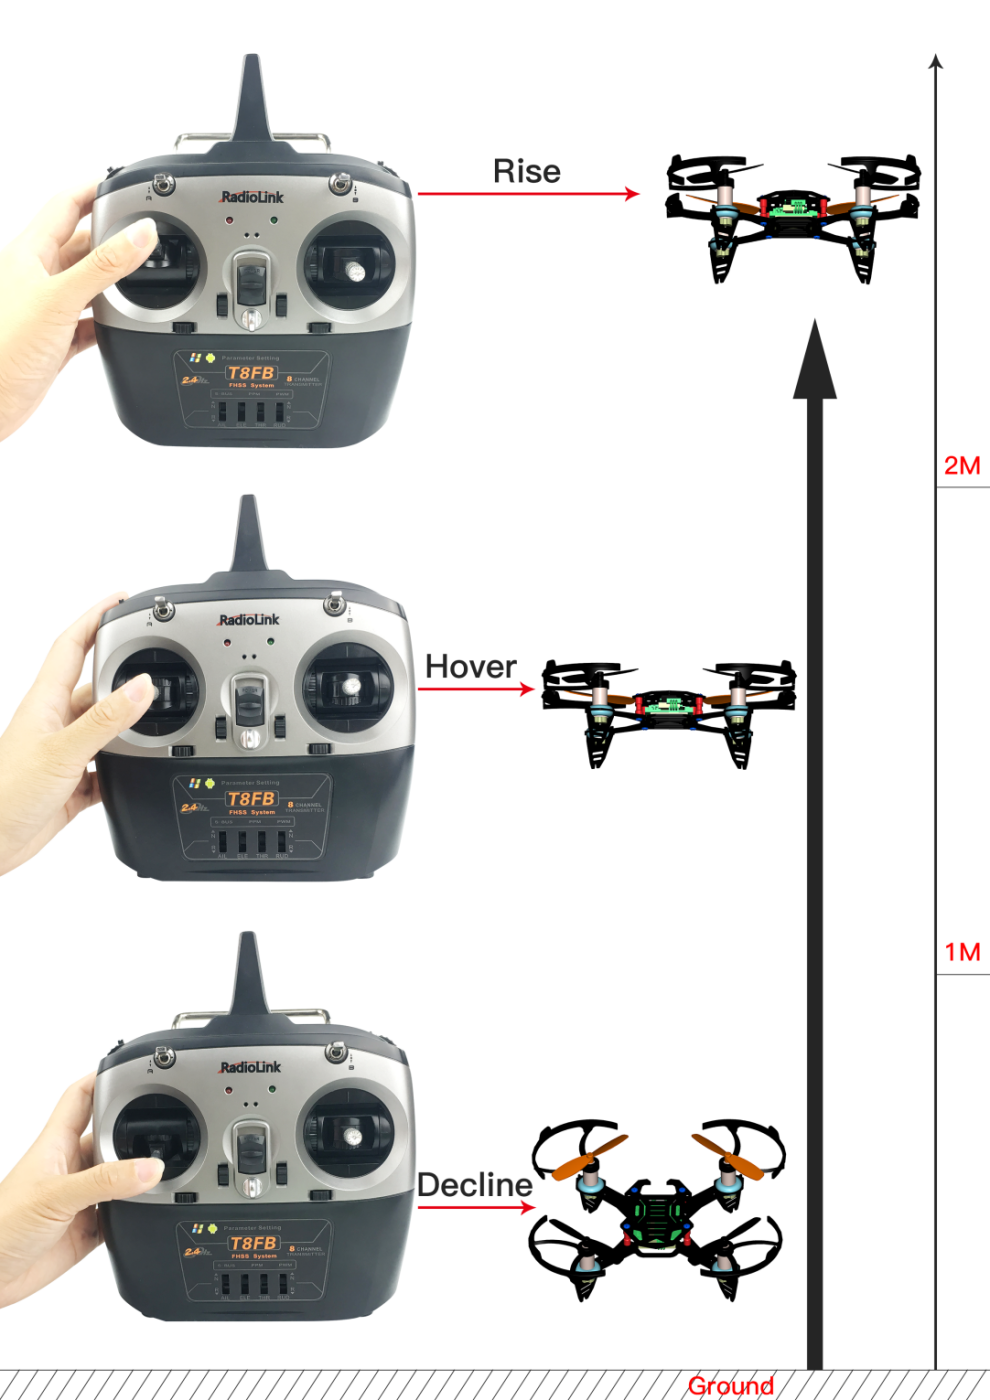
Throttle: Upward/Downward/Hover
Push the Throttle Stick (on the left) vertically upward and F110S will rise while if push the Throttle Stick (on the left) vertically downward, then the F110S will descend.
If at Alt-Hold Mode, push the Throttle Stick vertically upward till the F110S flight at the preferred height , then toggle the Throttle stick back the center position and release , the F110S will remain at this height.
Note Hovering is also called Altitude Hold, which can be only realized under the Alt-Hold Mode both either at low speed or high speed. BUT NOT STABILIZE MODE.
Rudder: Clockwise/Anticlockwise rotation
Push the Rudder Stick (on the left) to the left and F110S will flight anticlockwise while if push the Rudder Stick (on the left) to the right, then F110S will flight clockwise.
Elevator:Forward/Backward
Push the Elevator Stick (on the right) vertically upward and the F110S will flight forward while if push the Elevator Stick (on the right) vertically downward, then the F110S will flight backwards.
Aileron: Towards right/left
Push the Aileron Stick (on the right) to the left and F110S will flight towards to left while if push the Aileron Stick (on the right) to the right, then the F110S will flight towards to right.
Chapter 3 Get Ready to Flight
3.1 Propellers Installation
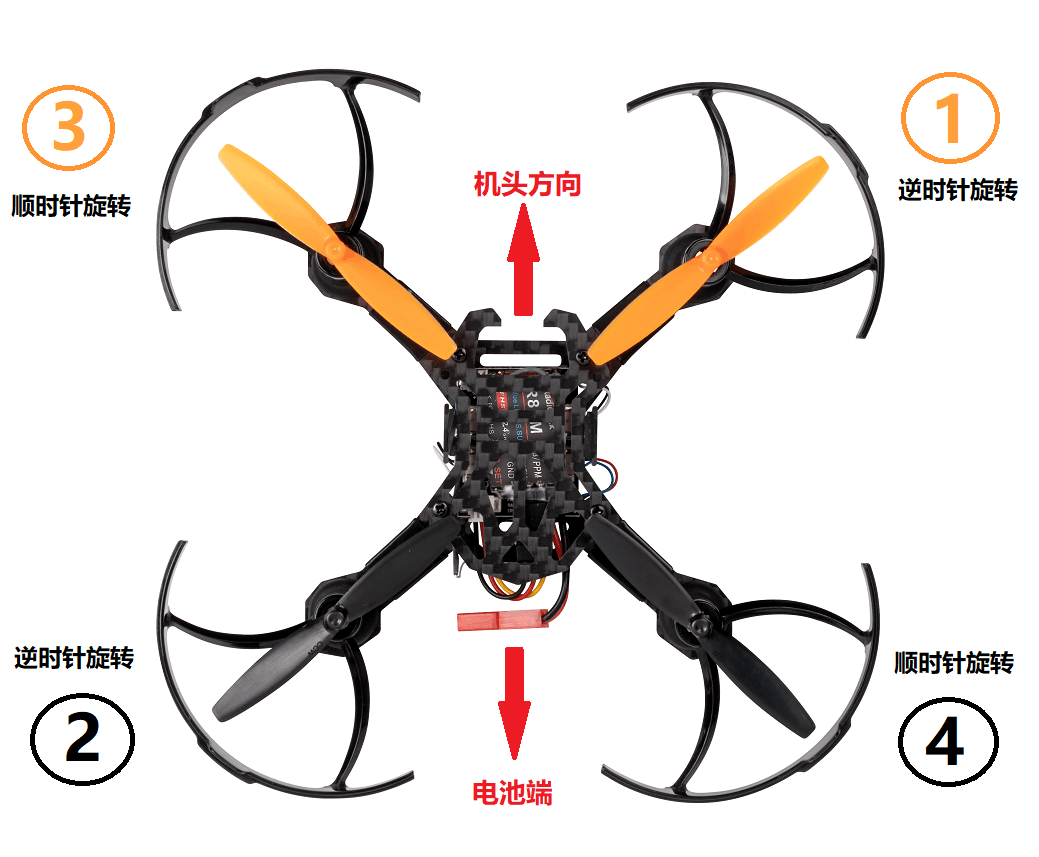
 F110S is packed with propellers protection cover by factory default. To install the protection cover, propellers need to uninstall first. Or after a period of flight, the default propellers may get worn and needs to be uninstalled to change with spare/backup new ones. It is important to well identify the propellers of positive/clockwise and negative/anticlockwise rotation. If installed incorrectly, F110S can’t take off even the throttle is pushed to max.
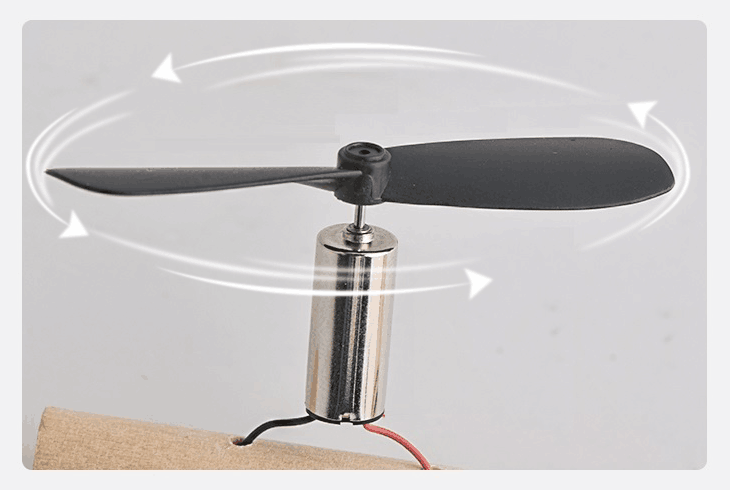
In order to identify the propellers rotation, take a propeller and observe there’s a radian at both sides of the small cylinder in the middle. The higher part (also called windward side) of the right propeller is at the front and the rotating motor will make propeller rotate anticlockwise. On the contrary, that is clockwise rotation.
Some propellers will be marked with number 1/2 or letter CW/CCW to differentiate (anti)clockwise rotation. Generally speaking, 1/CCW means anticlockwise while 2/CW means clockwise. Keep the propellers at both ends of diagonal the same when installing as shown below.
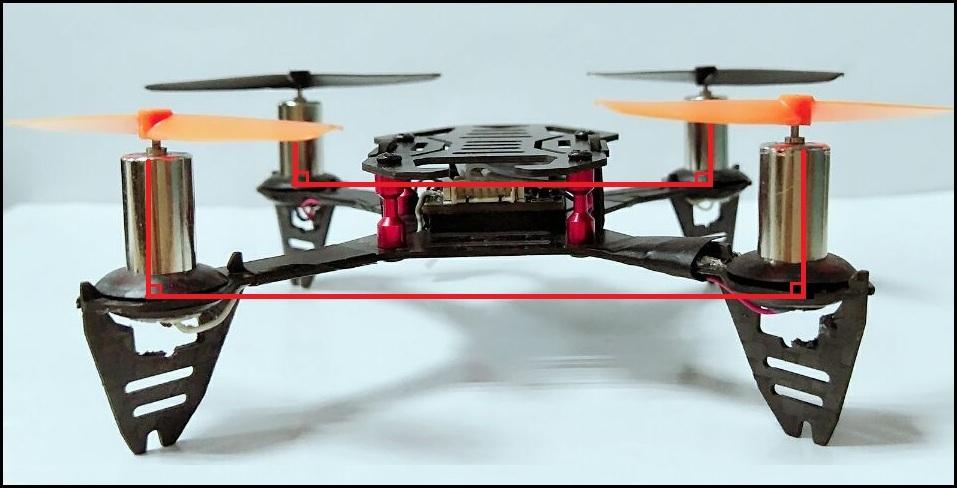
Note Remember to check if the four motors are vertical to the aircraft. Adjust them to vertical positions if necessary, otherwise F110S may not flight successfully.
3.2 Power OnF110S
Before powering on F110S, put 4 pieces double A battery or 1 piece of 2S/3S/4S LiPo battery in the battery case of the transmitter and the 1S LiPo battery tied on F110S.
Put F110S on a level surface and do not move it when the green LED is flashing.NEVER power on F110S by putting on hand as it’s not level.
Orange propellers default indicate the head direction, make sure the orange propellers
forward to the front when powering F110S on.
The green LED of F110S will begin flashing when power on. When it’s off, it means F110S is finished calibration.
NoteHead direction is determinate.If F110S is put differently from the direction when calibration, it will back to the same direction automatically when starts flying,That’s what we called Head Front Forward Point Without Compass.
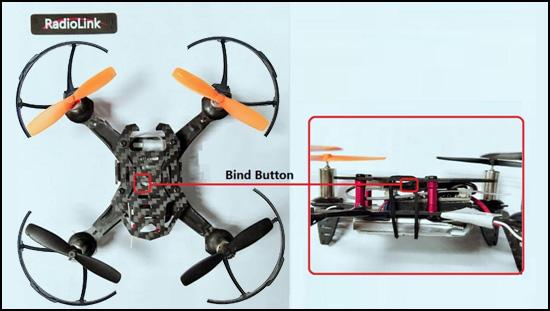
3.3 Binding
If it’s the RTF version( whole pack including T8FB+F110S+bag) purchased, there’s no need to bind because the binding is complete by factory default.However, if it’s onlythe aircraft F110S is purchased, binding between the transmitter and F110S needs to done first.
By default, F110S is equipped with receiver R8FM, which is compatible with Radiolink transmitter T8FB.
Place the T8FB and F110S close to each other within 50 centimeters.
Power on the T8FBand F110S.
There is a black binding button(ID SET) on the side of R8FM, press it for more than 1s.When the purple/blue LED of R8FM starts flashing, meaning binding process has started.
The binding is complete when the purple/blue LED is always on.
Make sure F110S is armed (Details in next section). Gently push the throttle of transmitter to see if motors move. If doesn’t, retry binding again.
NoteIf the LED of R8FM is red, press the ID SET twice in two seconds and release to change it to purple/blue). F110S currently support SBUS signal output only, always ensure the LED of R8FM is blue, meaning SBUS signals output.
3.4 Arm and disarm F110S
A. How to arm
Drone needs to be armed before flight. F110S is no exception.
Throttle on left stick: toggle the left stick to the lower right corner and hold this position for3 seconds till the green LED of F110S is on.

B. How to disarm
When the flight is finished, toggle the throttle stick to the left bottomfor 3 seconds till the green LED of F110S off.
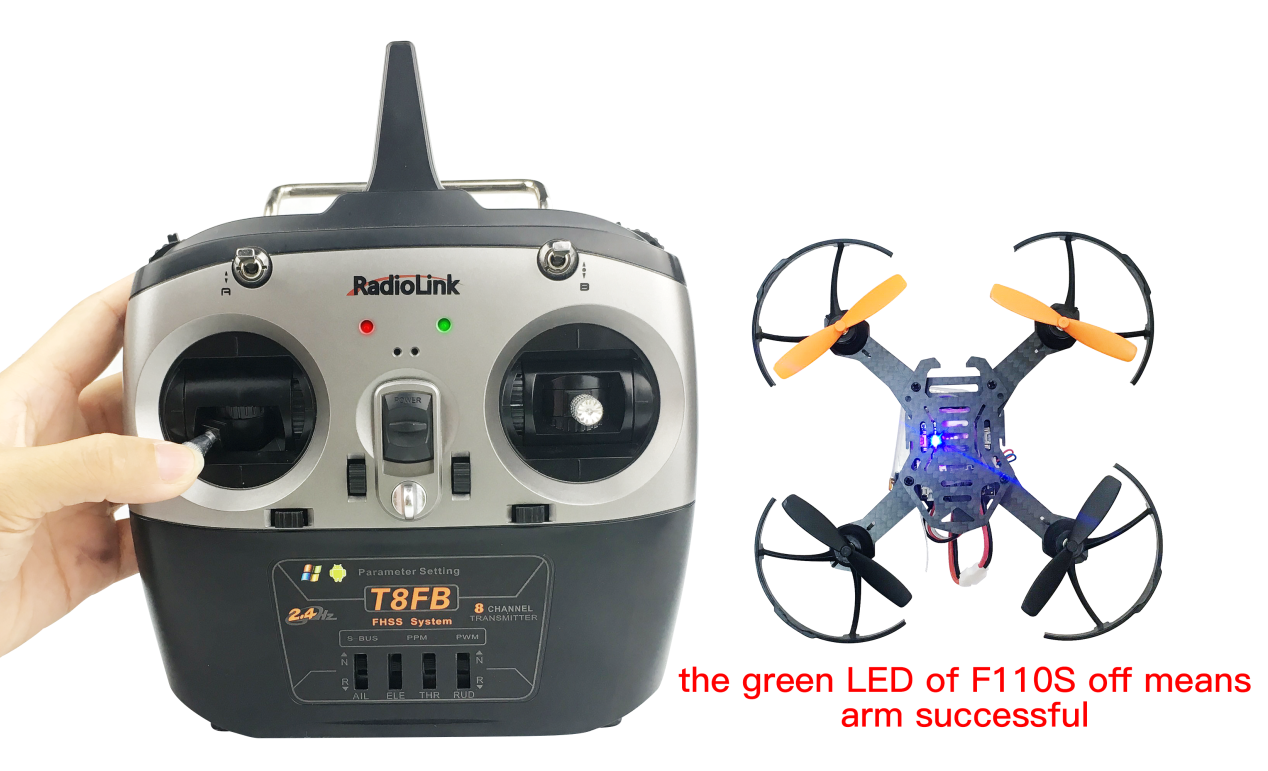
Note Always make sure F110S is disarmed when get close andtry touching it to avoid unexpected
harm.
3.5 Flight Modes
F110S has three flight modes by default: Alt-Hold at low speed Mode, Alt-Hold at high speed Mode and Stabilize Mode. The SWB switch on T8FB is used to change the flight mode as below shown. SwB at the up position means F110S will flight at Altitude Hold Mode (Low-speed) while at the center position means F110S will flight in Altitude Hold Mode (High-speed). Likewise, if SwB is at the bottom position means F110S will flight at Stabilize Mode. Each mode is slower and with less angular variation than the next one in row.
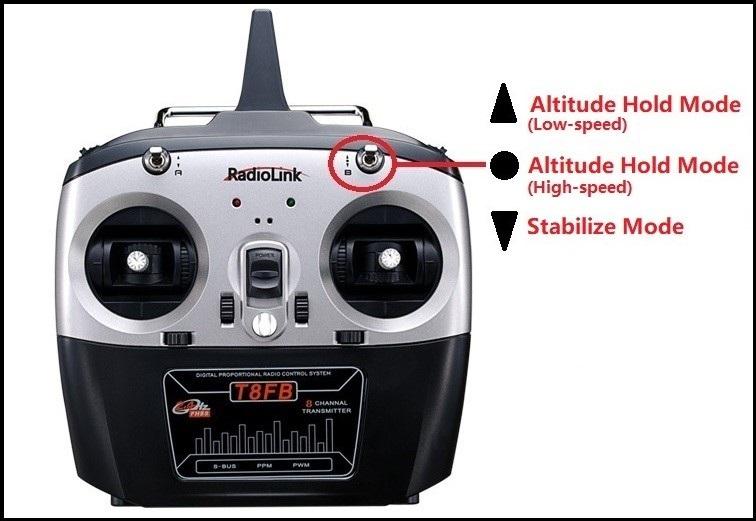
Therefore, it’s strongly advised for beginners to start from Altitude Hold Mode (Low-speed) to Altitude Hold Mode (High-speed) then to Stabilize Mode.
Note It’s better to keep the direction of F110S head same as pilot in order to easily judge the flight direction. Otherwise, F110S may flight towards pilot and get him/her hurt. If the aircraft head is changed unexpectedly and different from pilot’s direction, pull the throttle stick to the lowest position to land F110S.
3.5.1 At Altitude Mode:Rise/Descend
Toggle the SwB switch of T8FB to the up position, which keeps F110S work in Altitude Hold Mode (Low-speed). Make sure the orange propellers towards to the front when powering F110S on. Then arm F110S.Push the Throttle Stick (on the left) vertically upwardhigher than center position, then the F110S will rise while if push the Throttle Stick (on the left) vertically downward, then the F110S will descend.
3.5.2 At Altitude Mode: Hover
Push the Throttle Stick vertically upward till the F110S rises to a height as wish, then push the
Throttle stick back the center position and release , the F110S will hover at this height.
3.5.3 At Altitude Mode: Forward/Backward/Right/Left
At Altitude Mode, you can make F110S fight forward/backwards or towards to right/leftby toggling the right stick at the settled height .
For beginners, make sure to push the stick gently because beinga racing drone, F110S is pretty responsive. It’s advised to release the stick as soon as toggle to one direction so that F110S will back to level automatically. Otherwise, F110S will keep flying to THE direction with accelerated speed.
3.5.4 At Altitude Mode: Clockwise/Anticlockwise Rotation
When get familiar with the above flights, try flight clockwise/anticlockwise because the rudder practice is the more difficult to judge the flight direction.Clearly knowing the direction will quickly help master drone flight. Try imagine sitting on the drone could be better way to practice.
Push the Rudder Stick ( on the left) to the left and F110S will flight anticlockwise while if push the Rudder Stick (on the left) to the right, then the F110S will flight clockwise.
3.5.5 At Stabilize Mode
Toggle SwB switch of T8FB to the bottom position and keeps F110S work in Stabilize Mode.
When at Stabilize Mode, F110S will flight faster than when at Altitude Mode.Make sure that the battery is fully charged before enjoying the flight.
3.6 Low Voltage Alarm
When the green LED on F110S starts flashing during flight means the voltage of F110S is lower than 3.7V as this value is default. It’s advised to stop flying to avoid battery over discharging.
3.7Note
If this is the first drone flight , set the flight mode as Altitude Hold at low speed, which is much easier to control comparing with Stabilize Mode. When at altitude hold mode, throttle stick can be released when F110S rise to a certain height and it will remain at the height. By toggling the stick on right, F110S will move forward/backward/left/right. When at stabilize mode, toggle sticks as gentle as possible to avoid drastic movements, which may possibly hurt the pilot.
Put the throttle stick to the lowest position immediately to stop motorsrotating when F110S knock something.
Make sure the motors are perpendicular to F110S plate.
Make sure the LED of R8FM is blue, meaning R8FM output mode is SBUS signal.
Chapter 4 Image Transmission Instruction
The F110S Image transmission version is not equipped with FPV goggle or screen. Pilots need to purchase the goggle or screen with integrated 5.8G image transmission.
When receive F110S image transmission version, binding between F110S and FPV goggle/screen and set the frequency is necessary as the following steps.
Take off the cover from the camera on F110S
Power on F110S and the FPV goggle/screen
Press the button on image transmission and FPV screen/goggle to switch channels until clear
image are shown on the FPV screen/goggle, meaning binding is complete.
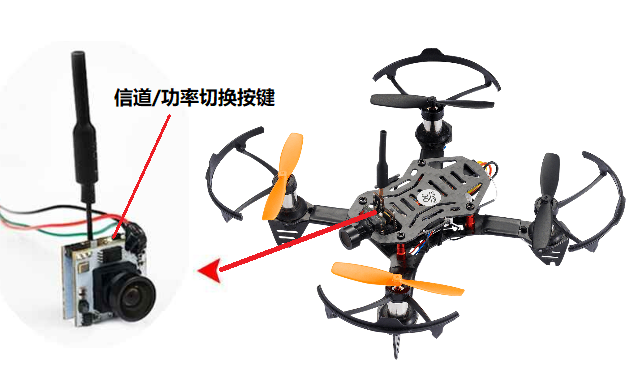
The F110S image transmission is from EWRF, having four modes 25mW/100mW/200mW/PitMode.
There are three LEDs at the back of channel switching button.
RED and BLUE always on means normal working status with Mode 200mW and channel A1 by default.
If RED is always on while BLUE is off, meaning it’s at PitMode. That is mode of transmission off. The transmission distance is 1-2m. It’s advised to choose this mode if there are many people switching channels simultaneously at the same space as channels won’t get mixed.
After powering on, long press the channels/power switching button to change MHz/channel bank/transmission power in row.
Long press the channels/power switching button, the RED led flashes once means entering MHz switching mode. Then short press the channels/power switching button to switch MHz (1-8). BLUE led flashes once means the current MHz is 1. The flashing time of blue led indicates the corresponding MHz.
When MHz is set, long press again the channels/power switching button. The RED led flashing twice means entering channel bank switching mode. Then short the press channels/power switching button to switch channel bank( A/B/C/D/E/F). BLUE led flashing once means the current channel bank is A. Each increase of the blue led flashing indicates the corresponding channel bank.
Thai is, 1-A,2-B,3-C...
Long press the channels/power switching button, the RED led flashes three times means entering image transmission power switching mode. Then short the press channels/power switching button to switch transmission power. When BLUE led flashes once, it’s 25mW; twice-100mW, 3 times-200mW.
When all parameters set, long press the channels/power switching button, the red and blue leds always on means image transmission saved and normal working status.
Note Setup won’t complete until the last step is done. Otherwise, the setup mode remains and all the parameters set above can’t be saved with success.
As image transmission of F110S is A1 by factory default, table below can be referred to change corresponding channel if necessary.
Channel/MHz | 1 | 2 | 3 | 4 | 5 | 6 | 7 | 8 |
A | 5865M | 5845M | 5825M | 5805M | 5785M | 5765M | 5745M | 5725M |
B | 5733M | 5752M | 5771M | 5790M | 5809M | 5828M | 5847M | 5866M |
C | 5705M | 5685M | 5665M | 5645M | 5885M | 5905M | 5925M | 5945M |
D | 5740M | 5760M | 5780M | 5800M | 5820M | 5840M | 5860M | 5880M |
E | 5658M | 5695M | 5732M | 5769M | 5806M | 5843M | 5880M | 5917M |
F | 5362M | 5399M | 5436M | 5473M | 5510M | 5547M | 5584M | 5621M |
Note
When installing the image transmission, make sure the heat radiation is considered. Otherwise, the transmission power will decrease even turn off as the protection of over heating is activated.
It’s advised to install antenna first then power it on so that the life span of image transmission can be extended to maximum limit.
In order to set the MHz and signal switching or auto search on FPV screen/goggle, please kindly refer to it’s corresponding manual.
Thank you again for choosing RadioLink products.