



 简体中文
简体中文 English
搜索结果建议
快速链接
FAQ
Q: How to set auto flight by following the waypoints in Mission Planner?
Q: How to set auto flight by following the waypoints in Mission Planner?
A: The setting steps can follow this manual by click the link below:
https://www.radiolink.com/newsinfo/475989.html
Q: Is it OK to keep the direction of arrow on FC different from the aircraft head?
Q: Is it OK to keep the direction of arrow on FC different from the aircraft head?
A: Yes. Just remember to change the corresponding direction at AHRS_ORIENTATION 17 in Full Parameter List .
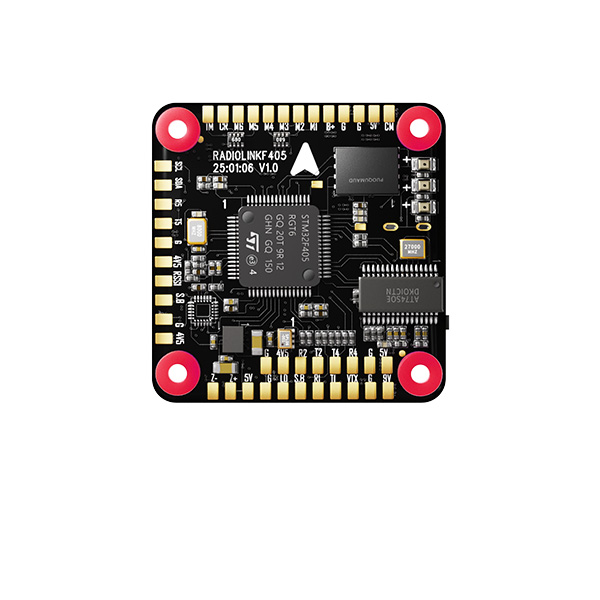
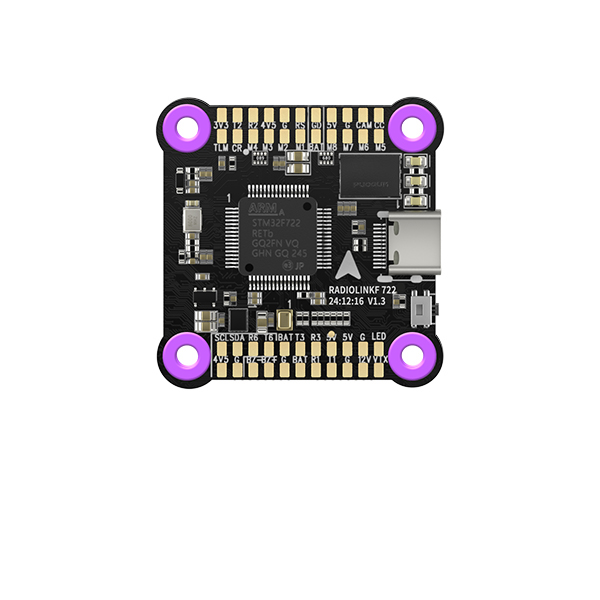
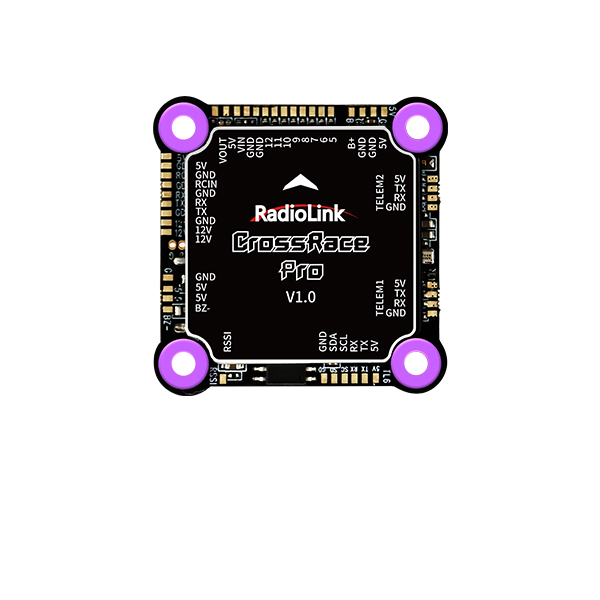
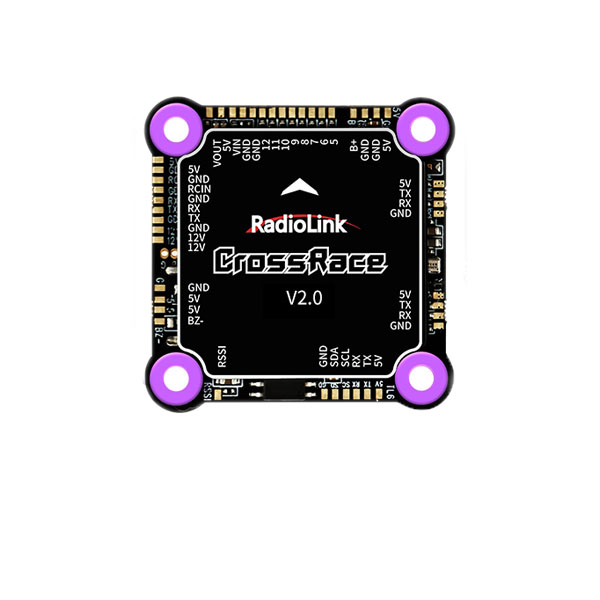
Q: DoesF722/F405/PIX6/PIXHAWK/CrossRace/CrossFlight/CrossFlight-CE/Mini Pix support redevelopment?
Q: DoesF722/F405/PIX6/PIXHAWK/CrossRace/CrossFlight/CrossFlight-CE/Mini Pix support redevelopment?
A: Yes
Q: How to set ESC Telemetry when using BLHeli 32 ESC?
Q: How to set ESC Telemetry when using BLHeli 32 ESC?
A: Please refer to the following setting methods:
1. Flight controller
After the basic configuration of the flight controller is completed, you can perform the following configuration to enable Dshot:
(1) Search SERVO_BLH_AUTO in the Full Parameter List and change the value to 1
(2) Search SERVO_BLH_MASK in Full Parameter List and check the pin channel corresponding to the ESC (if the ESC is plugged into channels 1, 2, 3, 4, check channels 1, 2, 3, 4)
(3) Search SERVO_DSHOT_ESC in the Full Parameter List and change the value to 1
(4) Search MOT_PWM_TYPE in the Full Parameter List and modify the value to the corresponding ESC protocol (Note: If you are using helicopter firmware, there is no need to modify the MOT_PWM_TYPE parameter. Please modify the value of SERVO_BLH_OTYPE to the corresponding ESC protocol)
(5) Power off and restart the flight controller.
2. ESC
After successfully configuring the flight controller, open BLHeliSuite32.exe.
(1) Select BLHeli32 Bootloader (Betaflight/Cleanflight) in Select BLHeil_32 Interface
(2) Select the corresponding flight controller port and connect
(3) Click Read Setup to read ESC information
(4) Enable Auto Telemetry of each ESC
(5) Power off and restart the flight controller, and connect the flight controller to the Mission Planner. The ESC telemetry information (escx_curr, escx_rpm, escx_temp, escx_volt) can be read in the status bar.
Q: Can PIXHAWK/PIX6/Mini Pix/CrossFlight/CrossFlight-CE work with 4-in-1 ESC? How do I connect them?
Q: Can PIXHAWK/PIX6/Mini Pix/CrossFlight/CrossFlight-CE work with 4-in-1 ESC? How do I connect them?
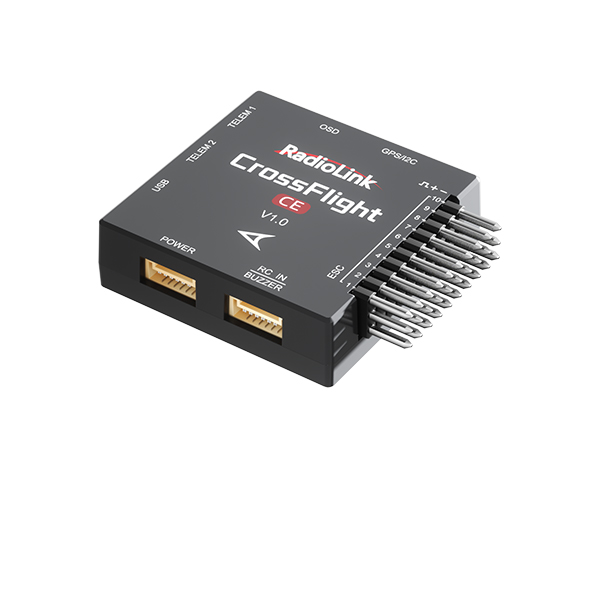
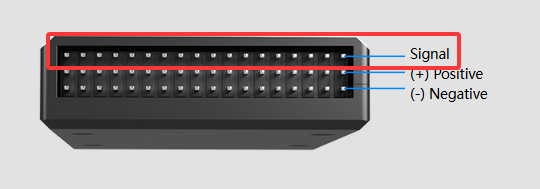
A: Yes. The signal wire of the ESC is connected to the pins of the flight controller. The 5V wire and the ground wire of the ESC is connected to any 5V and GND of the flight controller. Take CrossFlight as an example.
The signal wire of the ESC is connected to the pins of the flight controller. The pin at the top is the signal output channel of the flight controller.
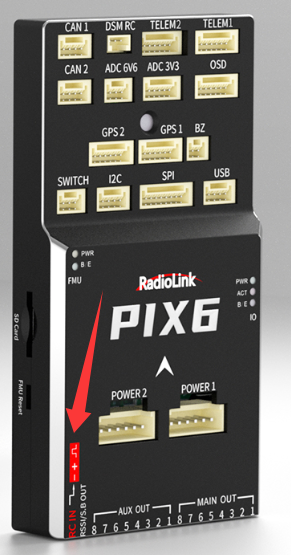
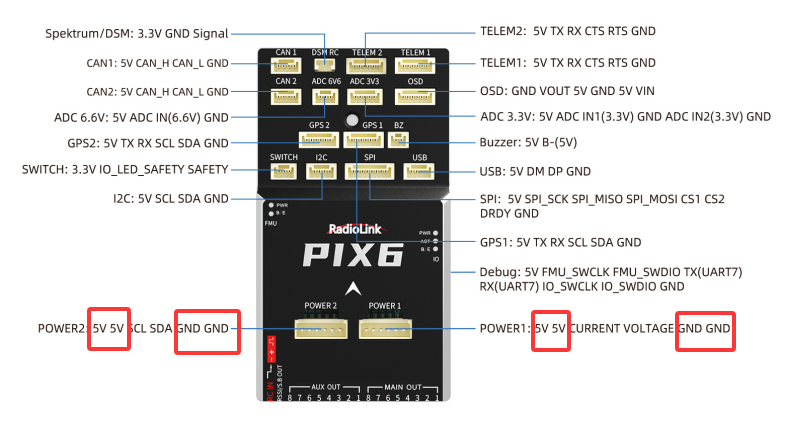
The 5V wire and the ground wire of the ESC is connected to any 5V and GND of the flight controller, as shown below:
Q: Can I remove the step of arming FC by pressing the safety button as this step has been set as factory default?
Q: Can I remove the step of arming FC by pressing the safety button as this step has been set as factory default?
A: Yes. Search BRD_SAFETYENABLE at the right column in Full Parameter List interface and set it as 0.
Q: Can PIXHAWK/PIX6/Mini Pix/CrossFlight/CrossFlight-CE/F722/F405 be used to control gasoline power fixed wing?
Q: Can PIXHAWK/PIX6/Mini Pix/CrossFlight/CrossFlight-CE/F722/F405 be used to control gasoline power fixed wing?
A: Yes.
Q: How to turn off FC auto checking and arm it directly with transmitter?
Q: How to turn off FC auto checking and arm it directly with transmitter?
A: Set the ARMING_CHECK in Full Parameter List in RadioLink Mission Planner as 0.
Q: Why the FC fails to be armed and keeps alarming?
Q: Why the FC fails to be armed and keeps alarming?
A:
1) If armed indoor, make sure the flight mode of the transmitter is set as Altitude Mode or Manual Mode. Never set the flight mode as Position Hold Mode nor Loiter Mode, which need GPS to functions. If arm the flight controller indoor with the Position Hold Mode, please wait for 1 minute until the stars quantity GPS searches reaches 12 or more after the aircraft is powered on and the position accuracy will be higher.
2) The geomagnetism may change and result in impossible arming even the aircraft debugging went well before. Problem can be solved by holding the aircraft and following the steps in RadioLink Mission Planner to do another geomagnetic calibration.
3) When the aircraft is powered on, listen to the music tone when flight controller is doing self-check. When the self-check is done with success, press the safety button to arm the aircraft. The arming may fail as well if press the safety button too soon.
If the above three causes have been checked and the FC still can't be armed, please connect it to the RadioLink Mission Planner to check other possibility or send mails to after_service@radiolink.com.cn for tech support.
Q: What should I do when I encounter any of the below three problems?
Q: What should I do when I encounter any of the below three problems?
1) The connection time between FC and RadioLink Mission Planner is long;
2) Neither option of Load custom firmware or Pick previous firmware is available at the interface of INSTALL FIRMWARE in the INITIAL SETUP sheet;
3) No option of ALL PARAMETER in the CONFIG/TUNING sheet.
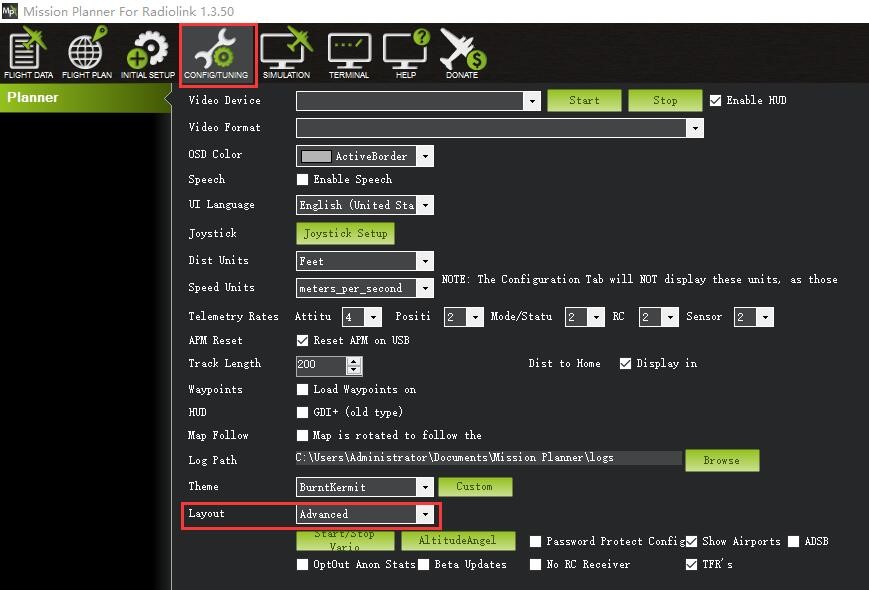
A: When any of the above three problems encountered during the connection to RadioLink Mission Planner and trying to flash the latest firmwares, modify LAYOUT from BASIC TO ADVANCED as below shown
Q: There is telemetry information when PRM-03 is connected to the TELEM2 port of PIX6/PIXHAWK/CrossRace/CrossRace Pro/CrossFlight/CrossFlight-CE/Mini Pix flight controller , but no OSD information when PRM-03 is connected to the TELEM1 port of the flight controller. Why?
Q: There is telemetry information when PRM-03 is connected to the TELEM2 port of PIX6/PIXHAWK/CrossRace/CrossRace Pro/CrossFlight/CrossFlight-CE/Mini Pix flight controller , but no OSD information when PRM-03 is connected to the TELEM1 port of the flight controller. Why?
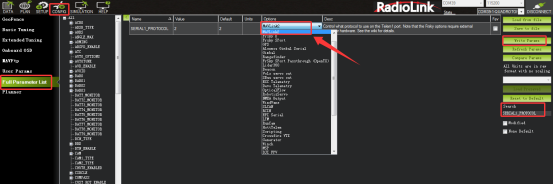
A: You need to adjust the parameter of the flight controller. Connect the flight controller to Mission Planner. Search for SERIAL1_PROTOCOL in the Full Parameter List. Select MAVLink2, and click Write Paras to save the modification.
Q: Does Mission Planner support the Apple MAC system? Does QGroundControl support the Apple MAC system?
Q: Does Mission Planner support the Apple MAC system? Does QGroundControl support the Apple MAC system?
A: Mission Planner does not support the Apple MAC system, but supports both Windows and Android systems.
QGroundControl Mission Planner supports Windows, Android systems, and the Apple MAC system, but needs to download from its official website.
Q: Does PIX6 support PX4 firmware?
Q: Does PIX6 support PX4 firmware?
A: Yes. Please refer to the link: https://www.radiolink.com.cn/pix6_px4_firmware
Q: How to change the PWM protocol to DShot protocol on PIX6 flight controller?
Q: How to change the PWM protocol to DShot protocol on PIX6 flight controller?
A: First, please determine the motor groups. There are 3 groups, including CH1 to CH4 of PIX6, CH5 and CH8, CH6 and CH7. When a row of pins in a group is configured as DShot, the remaining pins in that group will automatically be configured as DShot and cannot be configured for other functions. For example, if you insert an ESC into rows 2, 3, 4, and 5 of the flight controller and change the ESC protocol to DShot, pins 1-5 and 8 will all be configured as DShot and cannot be configured for other functions. When other rows of pins need to be configured for different modes, you need to allocate the corresponding pin functions according to the above groups. Solution: Insert the ESC into the same group of pins. This will allow you to configure the other pins for other functions.
Flight controller settings:
Set the functions pf the pins in the menu Setup -> Mandatory Hardware -> Servo Output.
Change the ESC protocol in the Setup -> Mandatory Hardware -> ESC Calibration -> ESC Type. Normal here means the PWM protocol.
Q: RadioLink receiver is bound to RadioLink transimitter, but Mission Planner cannot recognize the radio and cannot calibrate the radio. Why?
Q: RadioLink receiver is bound to RadioLink transimitter, but Mission Planner cannot recognize the radio and cannot calibrate the radio. Why?
A:Please troubleshoot by following the below steps:
1. Check whether the LED indicator of the receiver is blue/purple, that is, SBUS signal output. RadioLink flight controllers support SBUS signal (Most of them also support PPM signal). The blue/purple LED indicator of RadioLink receivers represents the SBUS signal working mode. If the LED indicator of the receiver is not in blue/purple, please short press the binding button to switch to blue/purple. The signal switching methods are different for different receivers. Please refer to the instruction manual of your receiver to switch signals.
2. Check whether the connection of all device is correct. The RC IN port of the flight controller needs to be connected to the SBUS signal channel of the receiver, and the positive and negative poles of all connections must be connected correctly.
Q: The fixed-wing firmware is installed. The flight controller cannot be arned. There is a failure message: PreArm: AHRS:EKF3 Yaw inconsistent xx deg. Wait or reboot (see image below).
Q: The fixed-wing firmware is installed. The flight controller cannot be arned. There is a failure message: PreArm: AHRS:EKF3 Yaw inconsistent xx deg. Wait or reboot (see image below).
A: The arming for fixed-wing firmware requires a stable GPS connection. Please move to an open area and wait for the GPS to acquire a satellite signal.
If you are doing an indoor arming test, please search for the parameter ARM_CHECK in Full Parameter List. Check all options except All, GPS lock, and INS.
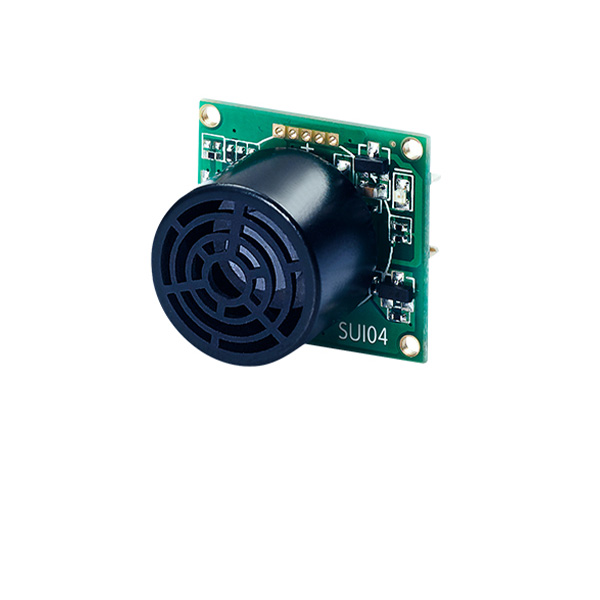
Q:How to set Alt-Hold function of SU04 with PIX6?
Q:How to set Alt-Hold function of SU04 with PIX6?
A: Please refer to the tutorial: https://www.youtube.com/watch?v=Qne7t-gWxqg
Q: How to output RSSI value from receiver to FPV?
Q: How to output RSSI value from receiver to FPV?
A: When you are using AT9S Pro/AT9S/AT9/AT10II/AT10, please refer to the link: https://www.radiolink.com.cn/attransmitter_pixhawk_rssi_output When you are using T16D/T12D/T8S/T8FB, please refer to the link: https://www.radiolink.com.cn/ttransmitter_pixhawk_rssi_output
Q: How to calibrate the accelerometer in Mission Planner?
Q: How to calibrate the accelerometer in Mission Planner?
A: Please refer to the tutorial: https://www.youtube.com/watch?v=6n_jcbPmY5I
Q: How to setup and connect DJI Digital FPV system to the flight controller?
Q: How to setup and connect DJI Digital FPV system to the flight controller?
A: Please refer to the tutorial: https://www.youtube.com/watch?v=nGV6GuiN9N0
Q: How to setup and connect Walksnail Digital FPV system to the flight controller?
Q: How to setup and connect Walksnail Digital FPV system to the flight controller?
A: Please refer to the tutorial: https://www.youtube.com/watch?v=ll3zyZqFhcs
Q: How to connect Skydroid T10 to the flight controller?
Q: How to connect Skydroid T10 to the flight controller?
A: Please refer to the tutorial: https://www.youtube.com/watch?v=-rJuC6j4ed0
Q: How to install TBS Crossfire on the flight controller?
Q: How to install TBS Crossfire on the flight controller?
A: Please refer to the tutorial: https://www.youtube.com/watch?v=T7Vm80klTFM
Q: How to Calibrate ESC on Multi-rotor with the flight controller?
Q: How to Calibrate ESC on Multi-rotor with the flight controller?
A: Please refer to the tutorial: https://www.youtube.com/watch?v=W1B5mgJaCEY
Q: How to calibrate the radio in Mission Planner?
Q: How to calibrate the radio in Mission Planner?
A: Please refer to the tutorial: https://www.youtube.com/watch?v=dh9Lu2BOSnA
Q: How to mount the flight controller on helicopter?
Q: How to mount the flight controller on helicopter?
A: Please refer to the tutorial: https://www.youtube.com/watch?v=um655Uxnqnw
Q: How to calibrate the compass in Mission Planner?
Q: How to calibrate the compass in Mission Planner?
A: Please refer to the tutorial: https://www.youtube.com/watch?v=XR_4e18F5W0
Q: How to set the helicpter?
Q: How to set the helicpter?
A: Please refer to the four tutorials:
https://www.youtube.com/watch?v=15aZ1V8DwrI
https://www.youtube.com/watch?v=w5jljKqSEEw
https://www.youtube.com/watch?v=pph-f_cv7j4
https://www.youtube.com/watch?v=nIt3Y4wVSYA
Q: How to download dataflash log on APM flight controllers?
Q: How to download dataflash log on APM flight controllers?
A: Please refer to the tutorial: https://www.youtube.com/watch?v=bFSnt5ETV9I
Q: How can I load parameters from other APM flight controllers?
Q: How can I load parameters from other APM flight controllers?
A: Please refer to the tutorial: https://www.youtube.com/watch?v=bFSnt5ETV9I
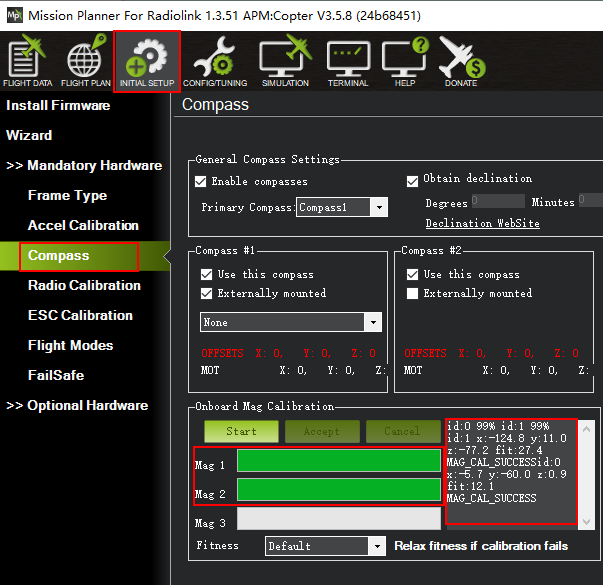
Q: RadioLink Mission Planner has two compasses shown if FC connected is GPS integrated. How to distinguish which FC compass it is?
Q: RadioLink Mission Planner has two compasses shown if FC connected is GPS integrated. How to distinguish which FC compass it is?
A: If the flight controller and the GPS with compass internal connect to the Mission Planner at the same time, the Compass #1 indicate the compass of GPS, meanwhile, the "Externally mounted" and the GPS direction select box will pop out on the Mission Planner. The Compass #2 indicate the compass of the flight controller internal.
Calibrate interface will shows as picture below when use with GPS.
If the GPS mounted with the same direction with flight controller, then it need not to setup the direction of GPS in Mission Planner but if you mounted the GPS with the different direction of PIXHAWK, you have to setup the right direction in the Mission Planner.
Q: What does COMPASSRARIANCE mean when connecting FC to RadioLink Mission Planner?
Q: What does COMPASSRARIANCE mean when connecting FC to RadioLink Mission Planner?
A: It means that there's problem about the compass. It can be solved by either calibrating the compass or removing possible disturbance resources to the compass.
Q: Why there's no data displays when FC connects to the RadioLink Mission Planner?
Q: Why there's no data displays when FC connects to the RadioLink Mission Planner?
A: Connect the RadioLink Mission Planner to flash the latest firmware. If it's notified that the latest firmware is already exist, flash again by changing another model e.g. ACROBATICS . If the problem still cannot be solved, it's probably the barometer is broken. Please send mails to after_service@radiolink.com.cn to furthur confirm and ask for accessory purchase.
Q: Why there's Bad AHRS notice when connecting FC to RadioLink Mission Planner?
Q: Why there's Bad AHRS notice when connecting FC to RadioLink Mission Planner?
A: When the FC is powered on, level it and remain still for a while, the notice should disappear. This notice usually appears in ACROBATICS firmware.
Q: Why there's Compass Variances notice when connecting FC to RadioLink Mission Planner?
Q: Why there's Compass Variances notice when connecting FC to RadioLink Mission Planner?
A: It's probably because of large disturbance. Remove all possible disturbances such as metal parts on aircraft frame. compass and GPS signal. If the notice is still there, calibrate the compass and repower it on afterwards.
Q: The aircraft descend speed is too high with the default value. Can this parameter be modified?
Q: The aircraft descend speed is too high with the default value. Can this parameter be modified?
A: Yes. This parameter can be modified at LAND_SPEED with the minimum speed as 30cm/s.
Q: Why the indicator on FC stays red after it's powered on?
Q: Why the indicator on FC stays red after it's powered on?
A: There are two possible reasons
1) The memory card is not well inserted or doesn't function.
2) The firmwares need to be flashed.
Q: The calibration of accelerometer, compass, radio has been finished, but why the plane turned over when it took off?
Q: The calibration of accelerometer, compass, radio has been finished, but why the plane turned over when it took off?
A: It comes from the wrong direction of motor or the reversed installation of the propellers. Check the motor and propellers.
Q: Why the altitude displayed in Mission Planner is many times the actual altitude of the flight controller from the ground or desktop? As shown in picture below:
Q: Why the altitude displayed in Mission Planner is many times the actual altitude of the flight controller from the ground or desktop? As shown in picture below:
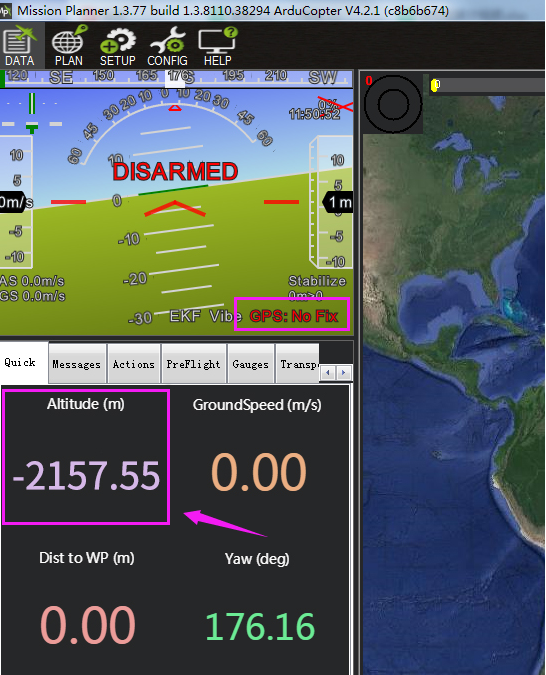
A: The altitude displayed in Mission Planner includes relative altitude and absolute altitude, depending on the setting options in Mission Planner. Double-click the "Altitude (m)" at the bottom left, and the parameter options will pop up.
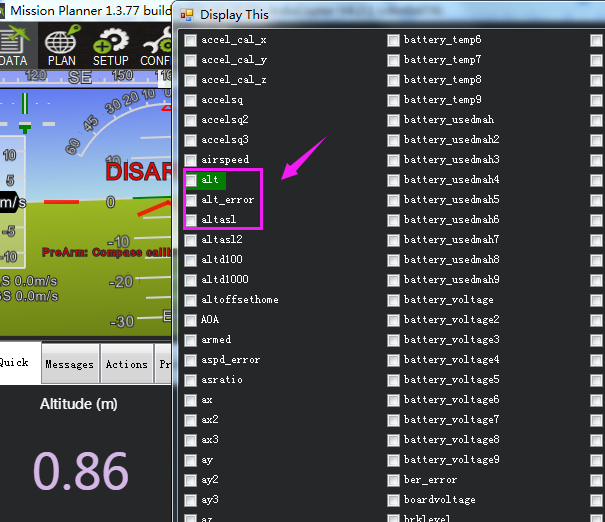
1. Alt means relative altitude. If this option is checked, the altitude is the height placed when the flight controller is powered on. For example, if we put the flight controller on the table and power it on, the altitude displayed in Mission Planner is the height from the desktop to the flight controller. If the flight controller is only tens of centimeters away from the table, but it shows 2000 meters in Mission Planner, there is something wrong with the barometer.
2. Altasl means absolute altitude. If this option is checked, the altitude is sea level altitude, which is the altitude above sea level.
The absolute altitude comes from the data obtained by the GPS. Only when the GPS finds the satellite and positioning is normal, the absolute altitude will be displayed correctly. Otherwise, the absolute altitude will be displayed as 0 by default.
Q:Why only telemetry of model voltage is sent to the transmitter, while other data such as peed, climb, throttle, longitude, latitude are not sent to the transmitter when PRM-03 is used with the flight controller?
Q:Why only telemetry of model voltage is sent to the transmitter, while other data such as peed, climb, throttle, longitude, latitude are not sent to the transmitter when PRM-03 is used with the flight controller?
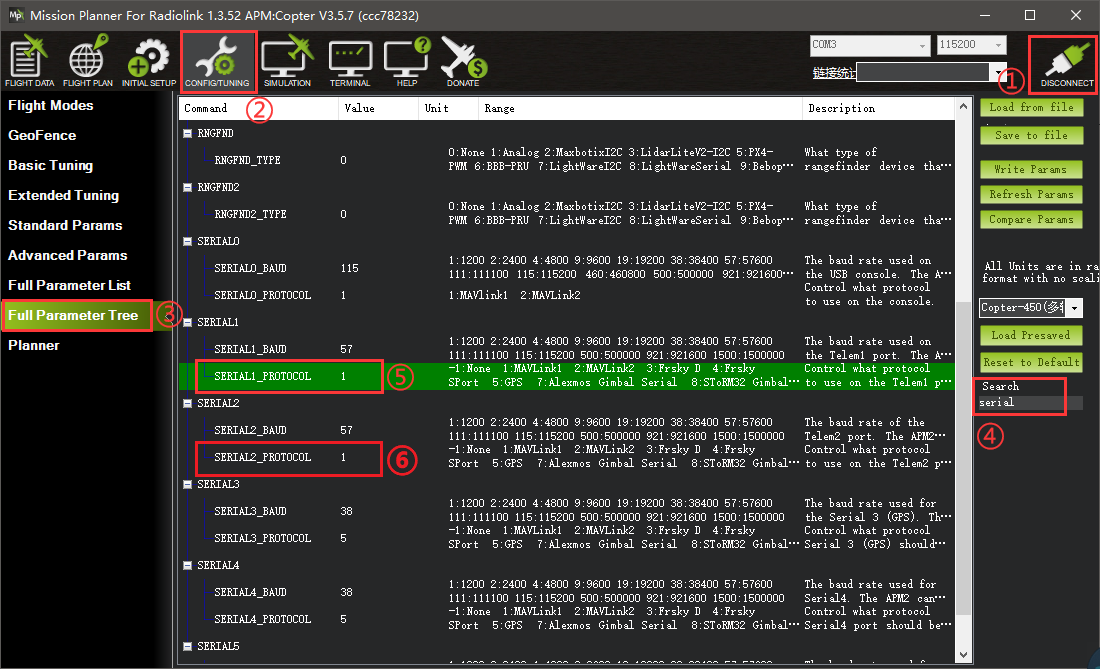
A: Since ardupilot updated the firmware recently, when users use PRM-03 with RadioLink transmitters AT9S Pro, AT9S, AT9, AT10II, AT10 and the ardupilot pixhawk flight controller which with the V4.1 or above firmware, only telemetry of model voltage is supported, telemetry of other OSD data is not supported. Please solve the problem by changing the value of SERIAL1-PROTOCOL and SERIAL2-PROTOCOL in Mission Planner.
CONFIG- Full Parameter Tree- search “serial”-Change the value of SERIAL1-PROTOCOL and SERIAL2-PROTOCOL to 1(MAVLink)
Note: PRM-03 produced before May 31, 2022 can refer to this method to modify the value, and those produced after May 31, 2022 do not need to modify the value.
Q: How to check the data sent to GPS by Mission Planner?
Q: How to check the data sent to GPS by Mission Planner?
A: The data sent by the Mission Planner to the GPS cannot be viewed.
Q: After flashing the firmware of PIX6, there is an error in Mission Planner, which shows: Baro: unable to initialize driver (as shown below). Why?
Q: After flashing the firmware of PIX6, there is an error in Mission Planner, which shows: Baro: unable to initialize driver (as shown below). Why?
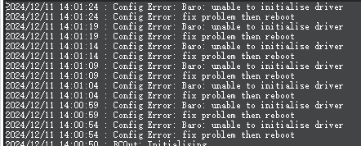
A: Please download the latest firmware from the RadioLink official website and flash the RadioLink firmware.
Download link of the latest firmware of PIX6: https://www.radiolink.com/pix6_firmware
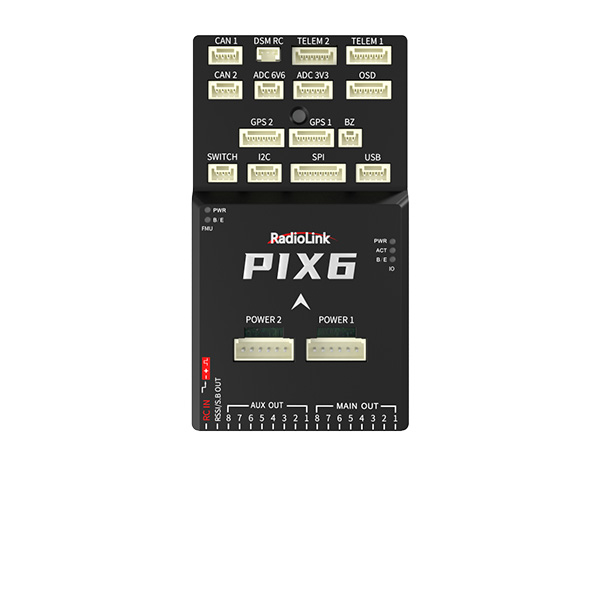
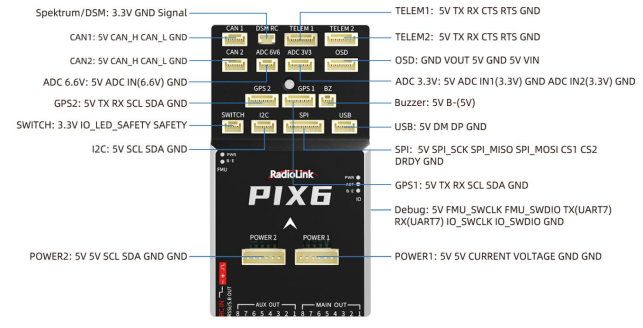
Q: What are the pinouts of the connectors of PIX6?
Q: What are the pinouts of the connectors of PIX6?
A: See picture below:
Q: How to set parameters if use PIX6 connect to the QuadPlane?
Q: How to set parameters if use PIX6 connect to the QuadPlane?
A: The setting steps can follow this manual by click the link below:
https://ardupilot.org/plane/docs/quadplane-support.html
Q: Why FC cannot be armed?
Q: Why FC cannot be armed?
A:Please check the pre-arm failure in Mission Planner and follow the solutions in the chart to solve the problem. Here is the link for reference: https://ardupilot.org/copter/docs/common-prearm-safety-checks.html
Q: Why there is no Fail Safe in Firmware version Airplane_v4.0.5?
Q: Why there is no Fail Safe in Firmware version Airplane_v4.0.5?
A: Firmware version Airplane_v4.0.5 has been upgraded. Set Fail Safe in all parameter list.
Q: How to power PIX6 without using the power module?
Q: How to power PIX6 without using the power module?
A:Please check the pre-arm failure in Mission Planner and follow the solutions in the chart to solve the problem. Here is the link for reference: https://ardupilot.org/copter/docs/common-prearm-safety-checks.html
Q: Does PIX6 support RTK?
Q: Does PIX6 support RTK?
A: Yes. PIXHAWK supports RTK without any settings on it.
Q: Does PIX6 support displaying flight data on the DJI goggles?
Q: Does PIX6 support displaying flight data on the DJI goggles?
A: Yes. Click the link below to view related tutorials:
https://ardupilot.org/copter/docs/common-msp-osd-overview.html#common-msp-osd-overview
Q: Can PIX6 be connected to four 40A ESCs?
Q: Can PIX6 be connected to four 40A ESCs?
A: No, it can’t. If PIXHAWK is used for a fixed-wing and connected to a single ESC, the ESC current can be up to 90A; If it is used for a multi-rotor and connected to more than 2 ESCs, the total current of all ESCs cannot exceed 90A. So if it is connected to 4 ESCs, the current of each ESC should be 20A or lower.
Q: When PIXHAWK is used with a Radiomaster transmitter and CRSF receiver, the transmitter cannot be calibrated in Mission Planner. Why?
Q: When PIXHAWK is used with a Radiomaster transmitter and CRSF receiver, the transmitter cannot be calibrated in Mission Planner. Why?
A: Because the receiver signal is not recognized in Mission Planner. Please connect the CRSF receiver to the data transmission port of the flight controller, and modify the parameters of the data transmission port to 23 in Mission Planner.
Q: Can I use QGroundControl to install the firmware of RadioLink PIXHAWK?
Q: Can I use QGroundControl to install the firmware of RadioLink PIXHAWK?
A: Yes, but you can only install the firmware by loading custom firmware when using QGroundControl. You cannot directly click on the model to install the firmware for PIXHAWK, because it is possible to install the PX4 firmware by clicking on the model. And RadioLink PIXHAWK is not compatible with PX4 firmware.
Q: How to set the high level and the low level in PIXHAWK?
Q: How to set the high level and the low level in PIXHAWK?
A: The setting methods are as follows:
1. Search SERVOx_FUNCTION in the Full Parameter List, and set data to -1 (x means channel)
2. Search RELAY_PIN and modify it to the value of the corresponding channel (The value corresponding to channel 1 is 50, the value corresponding to channel 2 is 51, and so on)
3. If there are multiple relays, set RELAY_PINx (x represents relay, RELAY_PIN2 represents relay 2, etc.)
4. Set the transmitter channel to control the high level/low level of the relay. Search RCx_OPTION, (RCx means the transmitter channel, RC7 means the 7th channel of the transmitter, etc.), and select Relay On/Off, which means controlling the first relay
5. If there are multiple relays, set multiple channels as above, search RCx_OPTION, and select Relayx On/Off (x means relay, for example: If the 5th channel of the transmitter controls the second relay, select RC5_OPTION as Relay2 On/Off)
6. Restart the flight controller
Q: How can I connect PIXHAWK to Mission Planner via Bluetooth?
Q: How can I connect PIXHAWK to Mission Planner via Bluetooth?
A: You can use a Bluetooth data link to connect the flight controller to the Mission Planner. Below is a detailed guide on how to connect the flight controller to the Mission Planner by using a Bluetooth data link.
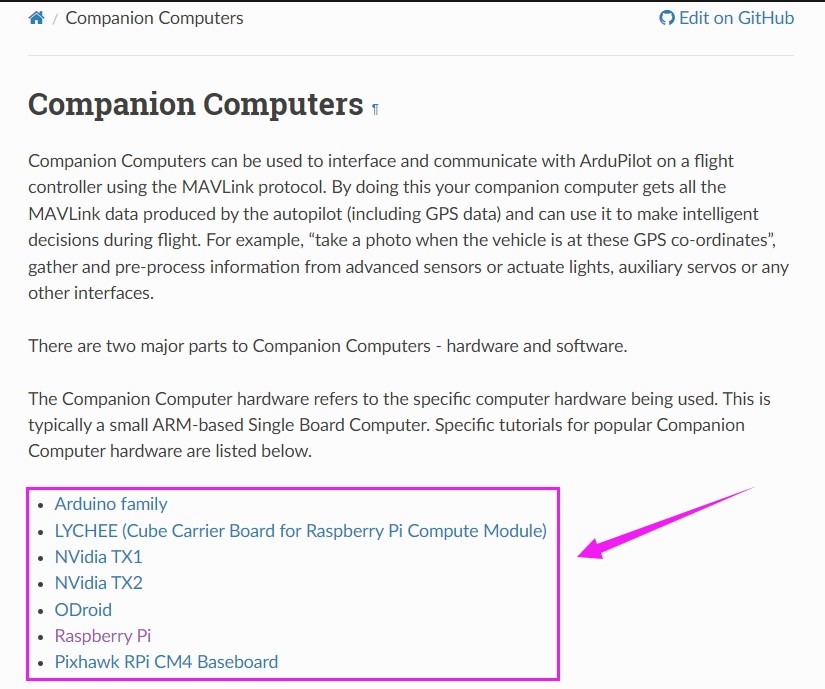
Q: Can PIXHAWK be connected to an external companion computer such as Raspberry Pi or Nvidia Jetson?
Q: Can PIXHAWK be connected to an external companion computer such as Raspberry Pi or Nvidia Jetson?
A: Yes. Below is the link to explain the setup. Click your device and then you can get the details on how to connect and set them up.
https://ardupilot.org/dev/docs/companion-computers.html
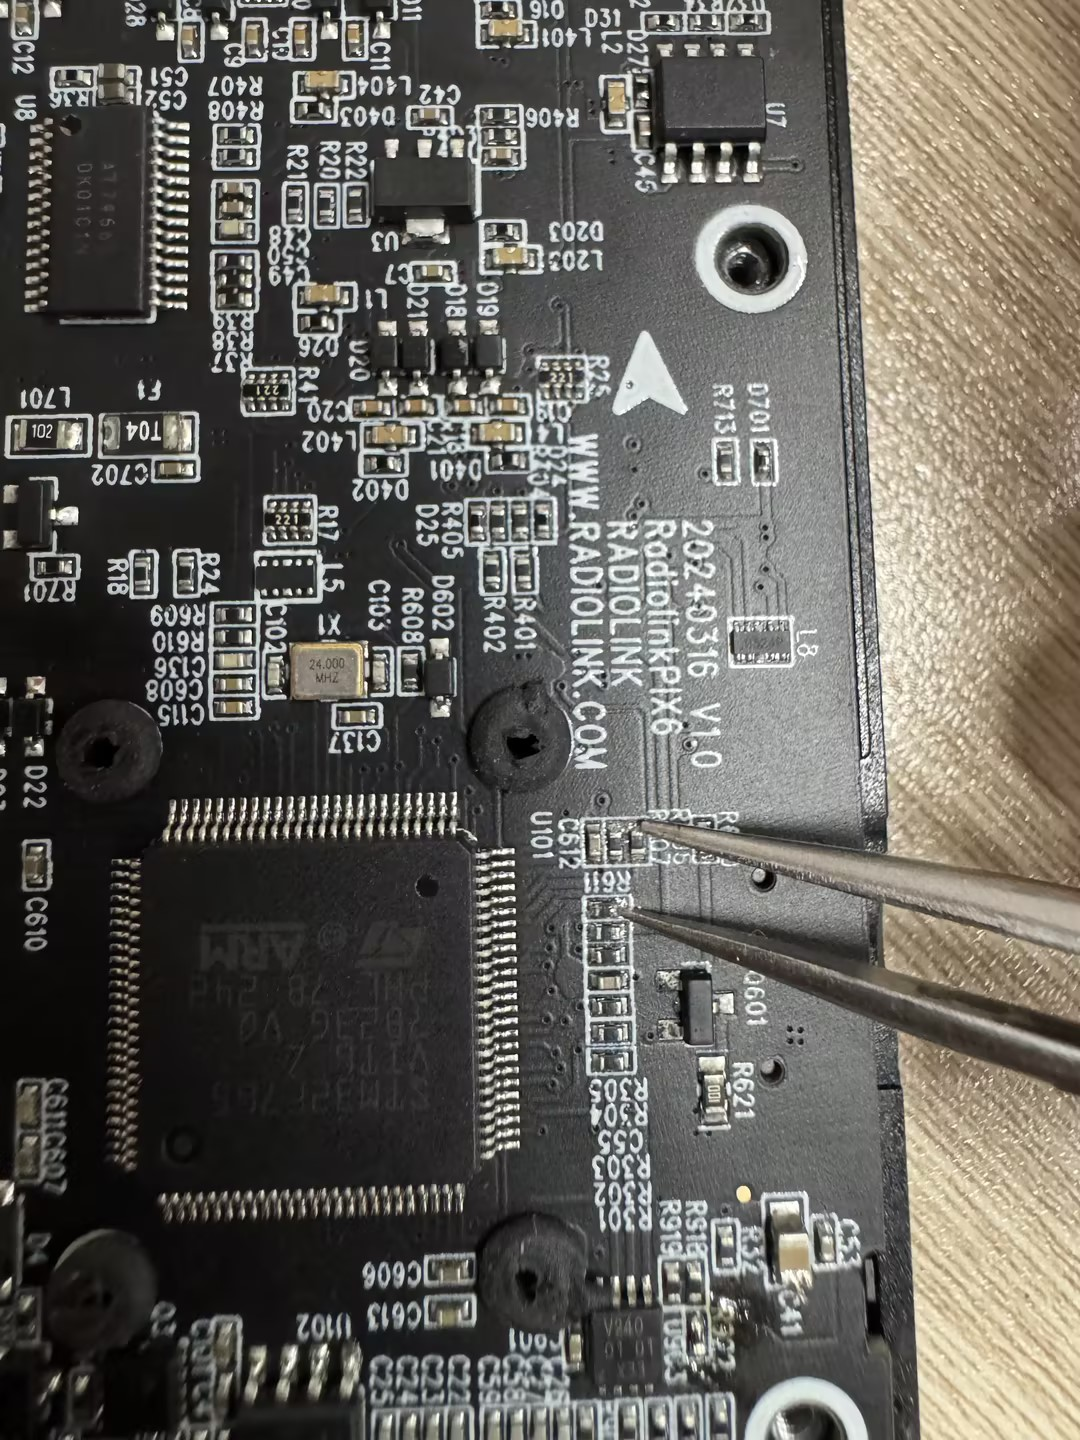
Q: How to put PIX6 into DFU mode?
Q: How to put PIX6 into DFU mode?
A: Please use a tweezer to short-circuit the below two points, and power up PIX6. PIX6 will automatically enter DFU mode.
Q: I use PIX6/PIXHAWK/CrossFlight/CrossFlight-CE/CrossRace/CrossRace Pro/Mini Pix with a ELRS receiver. I set FLT_MODE on CH5, and I assign a 3 position switch for 3 flight modes. The flight mode in the middle position is not available. Why?
Q: I use PIX6/PIXHAWK/CrossFlight/CrossFlight-CE/CrossRace/CrossRace Pro/Mini Pix with a ELRS receiver. I set FLT_MODE on CH5, and I assign a 3 position switch for 3 flight modes. The flight mode in the middle position is not available. Why?
A: When using an ELRS receiver, Channel 5 supports only 2-position switches, not 3-position switches. If you need to use the middle position of the 3-position switches to switch flight modes, you can assign the flight mode control to a channel other than Channel 5. Just set FLT_MODE to other channels in Mission Planner.
Q: How to connect a Spektrum receiver to PIX6/PIXHAWK/CrossFlight/CrossFlight-CE/CrossRace/CrossRace Pro/Mini Pix?
Q: How to connect a Spektrum receiver to PIX6/PIXHAWK/CrossFlight/CrossFlight-CE/CrossRace/CrossRace Pro/Mini Pix?
A: Please refer to the below link:
https://ardupilot.org/copter/docs/common-spektrum-rc.html#common-spektrum-rc





 简体中文
简体中文- English